Monday, 26 August 2013

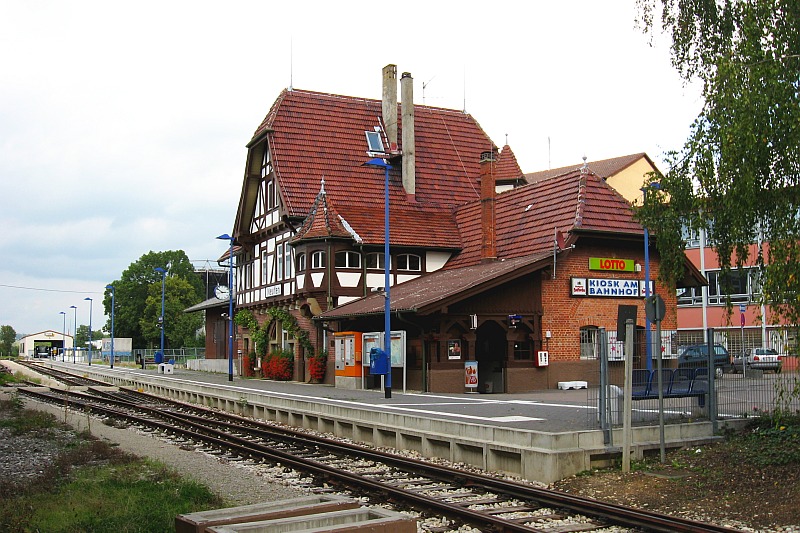
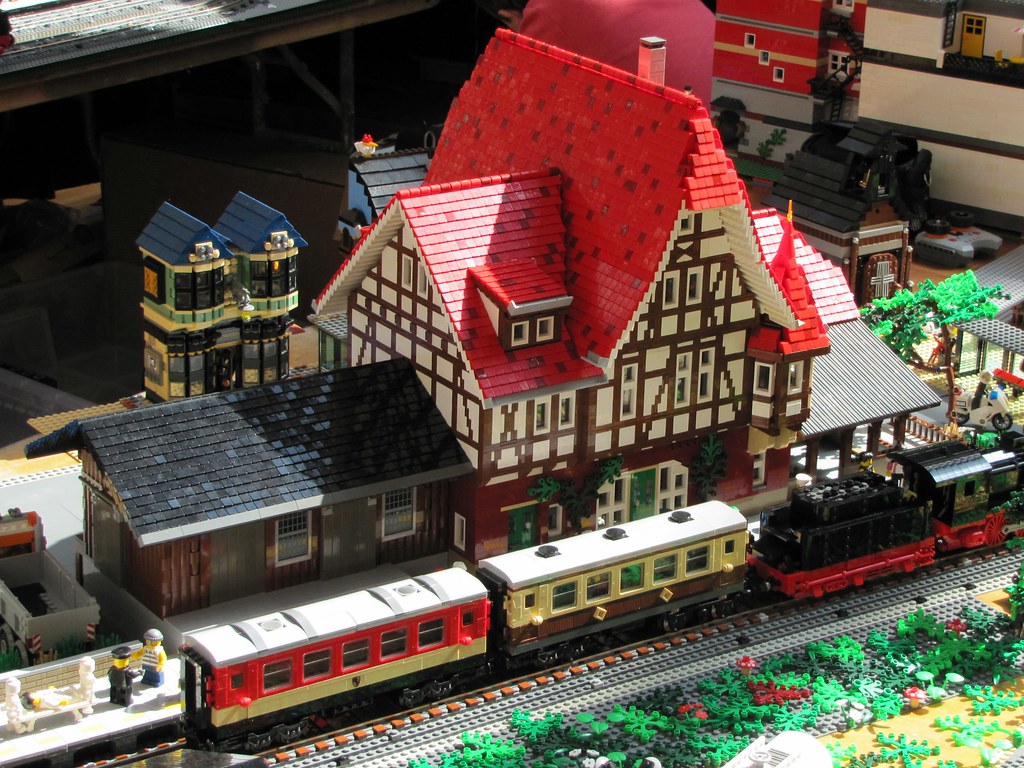
A lovely looking Neuffen Train station.

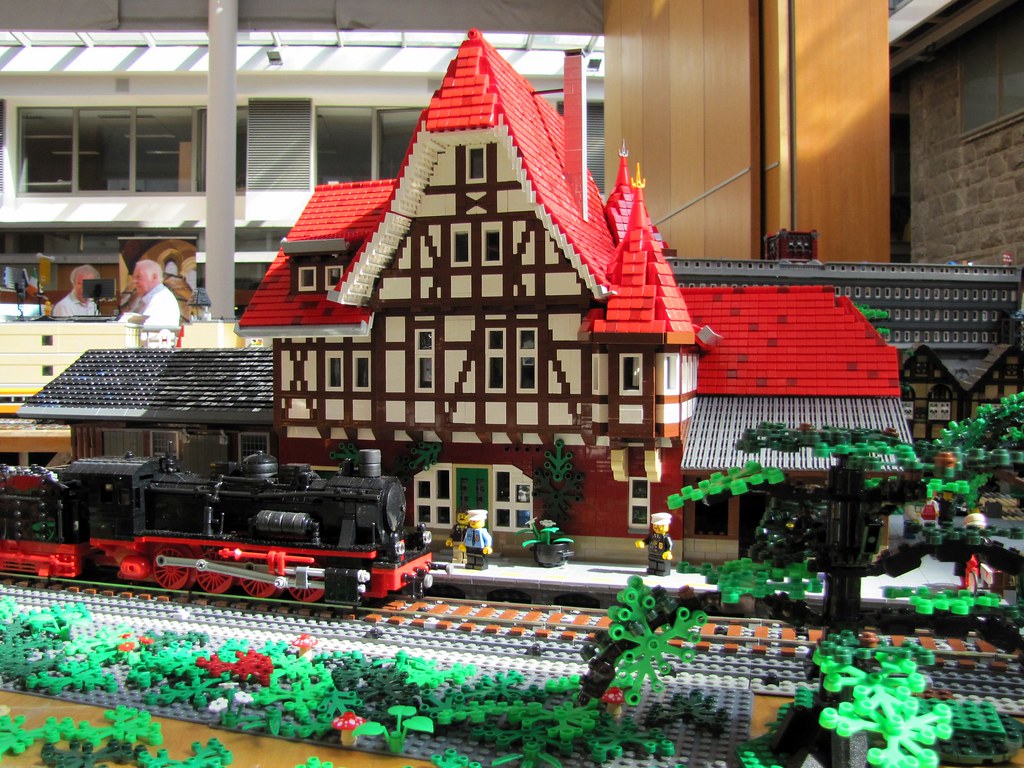
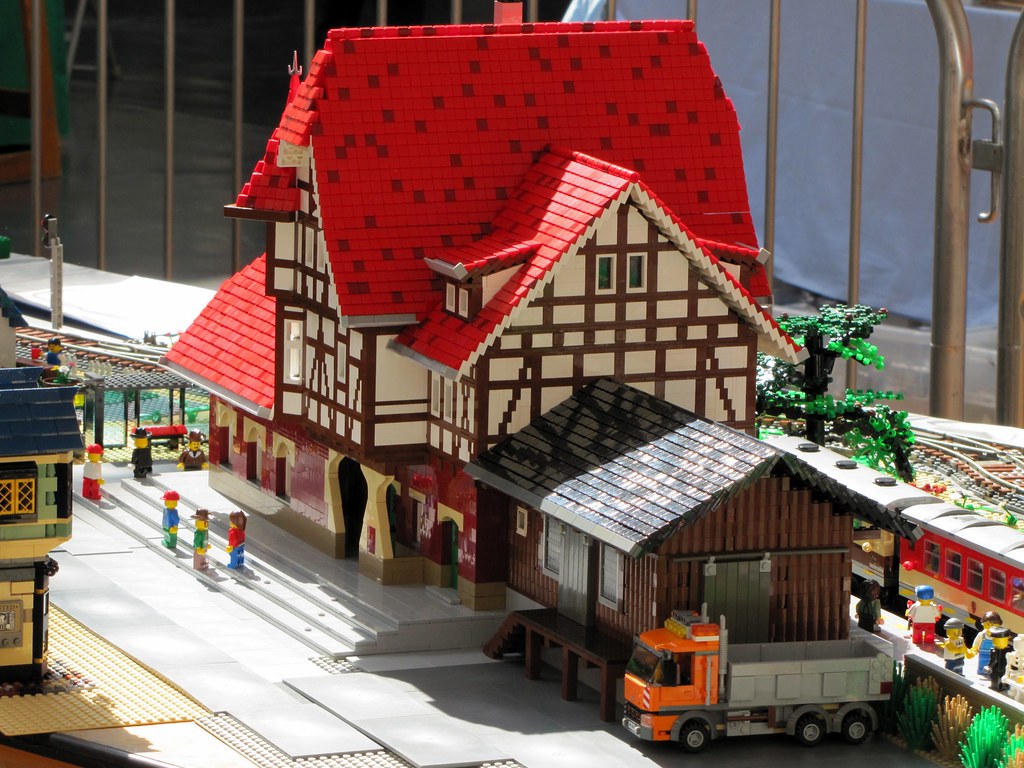
While browsing Flickr I came across a Beautiful model that Flickr member Duq from Ireland had created.
The Neuffen station was built for The Dun Laoghaire model railway show and he mentions that it is still a work in progress... O-o Amazing!

As a youngster he had an N-scale model of this station and wanted to recreate it in Lego. I think he pulled it off... don't you? For the main structure Duq used over 3000 red cheese slopes and 250 dark red cheese slopes and around 900 black cheese slopes for the side building. Doing the roof alone would have taken a month of Sunday's alone, but the rest of the building and it's surroundings are simply stunning! 
For a WIP I can not wait to see the end result!

Well done Duq! You have yourself a fan right here.


Here is a comparison shot of the original Station.


LEGO City 60013: Coast Guard Helicopter Review

 After Reviewing LEGO Architecture 21017: Imperial Hotel  We will continue with the new City Coast Guard theme. Today we are going to take a look at 60012 Coast Guard Helicopter. This made my son very happy as he got to build 4 mini figs this time around missing out on any in the last review. Just a side note...
Upon building this set our white shark was missing so I had to buy another set while I await a replacement Shark from LEGO to do this review (Q: Why buy another? A: We lost the receipt for us to return it plus I wanted 2 anyway :-P)

LEGO City 60012: Coast Guard Helicopter. 
 The set contains 230 pieces and retails for $39.99.
 Comes with 4 Minifigures: Coast Guard Helicopter, Catamaran and a White Shark.
  
Note: All photo's can be clicked on for a larger view.

The Front box art shows the brave coast guard flying in to rescue a troubled sailor from a broken down catamaran whilst it approaches the rocks and a great white shark closes in on his pray.    Note: Boat does not float.


The box art on the back shows the sailor on his catamaran. Showing you how to reenact a broken sail. The sailor shipwrecked on the rocks with the Coast Guard close by for the rescue. on the bottom right shows how the winch works on the Helicopter.The diver in the water looking to wrestle the Great White Shark!


Upon opening the box we get 2 numbered bags. Loose in the box are instructions, a sticker sheet and a plastic sail.


Here is a close up of the sticker sheet. There are 15 stickers to apply in total.


A close up of the sail. This is it second outing, previously last seen only in set 4644: Marina.


The contents of bag 1. This will build the catamaran and the body of the Helicopter. All 4 minifigs are in bag 1.


A look at the breakdown of what bags 1 and 2 will build.


This is the second time we see the wetsuit, previously in 60011: Surfer Rescue 
The minifig has a single sided smiley face print.


Our first and only female Coast Guard Crew Member. She too has a single sided face print and comes with the new blue hat and headphones.


The Pilot has the new uniform like the last few coast guard sets I have reviewed. Standard helmet and visor


Same with the diver, different face print of course. Same great detail on the torso.


One of the few reasons I wanted this set was for the new white shark. On the the box art it shows the new mold, but sadly what I received was the old mold with no gills. I wonder if the one I was missing in the first set had the new mould.  :-(
But other than that this looks great in white.


A step by step picture on the construction of the catamaran.


Catamaran complete with sailor. A fun quick build, I really like the look of it, simple, yet effective.


Now we move on to the step by step process for the main body of the helicopter. 11 stickers are applied in this section.


Bag 2's contents will finish off the undercarriage and the helicopters engines and rotor blades.


A quick step by step picture building and finishing the copter and the last 4 stickers to apply for this section.


All finished! Building this had the same feel as when I built and reviewed 60015: Coast Guard Plane, with the exception of the obvious differences, the body was almost in the same vain.
 

Finally the spares... less then I thought we would get since we got a spare flipper in 60012: 4x4 & Diving Boat and a spare life jacket in 60011: Surfer Rescue. A spare wheel for the spare tyre would have been nice too.


Final couple of shots of the completed set.


Overall thoughts on this set are in the positive. The fact that you get 4 minifigs, a white shark (albeit the wrong mold) and a large and small vehicle/vessel really helps sell this set. Surprisingly we have the same RRP as the U.S which helps give another reason that this is a great set for its value. With a sale on almost fortnightly it seems, getting it for less $$ is a nice excuse to pick this set up. (not that we need any excuse) My son and daughter have played with it now for almost 2 hours straight so I will say its a big thumbs up. They are loving the winch play feature on the copter... best way to catch a shark... use the sailor as bait.
Go get it if you haven't already.

Thanks again for reading!

As always and if you want too, let us know in the comments below, what you think of the set. I would love to hear others opinions on it.

Until next time this is Tan Tile... splashing in for the next review.


Monday, 19 August 2013

LEGO Architecture 21017: Imperial Hotel Review.

Today's Review is something a little different. Stepping away from the normal everyday sets, we will take a look at a 2013 release of set 21017: Imperial Hotel from the LEGO Architecture series. This is my first set in the range and I must say that the packaging is beautifully presented. It has a higher quality of box compared to the normal everyday sets we get at the toy store. It definitely gives off a "This one is for the adults" feel, and it rings true because my Son was very disappointed to find out there was no Minifigures for him to build.

LEGO Architecture 21017: Imperial Hotel
 The set contains 1188 pieces and retails for $189.99.

 Note: All photo's can be clicked on for a larger view.

  Although my box arrived in not so "mint condition" the look and feel of this set is stunning.  

 A quick glance at the back of the box gives a brief one paragraph description of architect Frank Lloyd Wright and his building. The rest of the writing are all in different languages. 


Opening the box we see bags of parts tightly packed and full to the brim. Very little room for air or movement during shipping which makes me wonder why other sets aren't packed this way, because it seems to work extremely well.


The instruction book is packed at the bottom under all the bags keeping it flat and in perfect condition.
Another reason why all sets should be packed this way - no more bent or creased instructions or sticker sheets.


A side view of the book, I placed a 1x1 plate to give you an idea of how thick the instruction book is.


Just some random images of the inside of the book before we start the build.


Another thing I noticed is the the black background for the parts call out and step by step build. Stunning! It totally works and makes the build feel even more special.


We have 10 unnumbered bags and sitting loose on top of the instruction book are Six 6x16 black plates.

Funny how the 6x16 plates on the left look thicker then the ones on the right... must be the lens.

Waaay to many pieces to sort and line up... so I opted  for the tip and spread technique. So many little pieces. Amongst all those pieces there is one 1x8 black printed tile with Imperial Hotel on it.


Just like a comic, below are some step by step pictures of how the Imperial Hotel progressed.


After about six hours of building: including picking up my Daughter from school, home reading, cooking dinner and washing up, getting lunch ready for the next day then getting both kids into bed, I finally got it finished and wow... Just wow.
I will let the next few pictures speak for themselves.


Love the printed Imperial Hotel tile!


 Some very useful spares are left over!


Overall the Imperial Hotel was and is a brilliant build! The set was intricate, fiddly and a challenging build  with all those small pieces. The use of the SNOT* technique throughout made this one of my favorite builds to date. There is also a lot of jumper plates used and it amazes me how by the end they all join back up! The colors used are well balanced but I wish with all the tan pieces that there could have been a few Tan Tiles :-) but that's just my personal opinion :-p. By the end I was totally surprised at how big this set was and now think I want more of these.
The clean finish with all the tiles adds perfectly to the aesthetics and brings out the best in LEGO.
I originally purchased this set just for the parts (found this for $100) but now find it hard to break it back down. I may need to buy another to do what I originally planned. doh!

 *SNOT is an acronym for Studs not on top. 

Thank you again for reading!
As always if you like let us know in the comments below, what you think of the set. I would love to hear others opinions on it.

Until next time this is Tan Tile... checking out for the next review.

Monday, 12 August 2013

LEGO City 60011: Coast Guard Surfer Rescue Review

Popped into Woolworths last week to get some grocery's and found this cute little set. I had to get it!
Well to be honest my Wife found it and grabbed two. One for me and one for my Son.... How sweet. :)
Lets have a look shall we.
LEGO City 60011: Surfer Rescue
 The set contains 32 pieces and retails for $9.99. (not the best price per piece but looks awesome!)
 Comes with 2 Minifigures: Coast Guard Jet Ski, Surf board and a Shark.

Note: All photo's can be clicked on for a larger view.
 

Nothing on the back, just info on where the components were made.


With a set this size we get 1 unnumbered bag. Loose in the box we also get a shark body, an instruction manual and a sticker sheet. 


A close up shows that there are 4 stickers in total to apply for this set.


The contents of the lonely bag isn't much, but the fact that so little pieces makes for an awesome looking Jet Ski is a thumbs up from me.


We all know what a shark looks like... right?


Coast Guard Rescuer has the same torso print as 60012 but with a different single sided head print.


 Surfer in Wetsuit is a new print in this color and only comes in 2 sets so far.
He too comes with a single sided head print. The surf board is it's second outing, seen first in white with the Seaside House.


With all my reviews I try to at-least add a step by step image of the build. Here is the Jet ski.


Now for the last lot of pictures that show of this great little set!


 Surfing along without a care in the world that there is a shark behind him. Luckily the Coast Guard has spotted the shark and is ready to intercept!


 Just in time! Blocking the path of the hungry Shark.


Finally the spares that you get in the set. Oddly with the exception of the visor piece, all these spares are uncommon for this size set or any size and are very welcome.


My overall thoughts are that this is a great set. For a small set this packs a punch in terms of playability. Kids will love this set and of those who also love sharks will enjoy eating the surfer, that's guaranteed. With so little parts and to make something this cool Lego need to pat themselves on the back with this one. I highly recommend you to get this set, plus it's not too hard on the wallet/purse. The kids will love it!


Thank you again for reading!

Let us know in the comments below, what you think of the set. I would love to hear others opinions on it.

Until next time this is Tan Tile... Going to change my wetsuit for the next review.