Well it's finally here! The biggest and final set of our reviews in the Castle theme. I have been looking forward to building this big set since I purchased it a few weeks back. So I got stuck into it the other night. We were able to pick it up during the Target sale for $99 but a week later we picked up a second set at Myer for $89. Both prices are fantastic for a set this size.
LEGO Castle 70404: King's Castle
The set contains 996 pieces and retails for $139.99.
Comes with 7 Minifigures: Battering Ram/Catapult, Horse, and modular Castle with 6 sections.
Note: All photo's can be clicked on for a larger view.
The Front of the box show the Kings Knights defending their Castle from the Dragon forces who are trying to steal the Kings Gold once again.
On the back of the box Show us the main layout of the Castle. On the left side of the box it gives us examples of other ways the Castle can be laid out. There are also images of how you can lock up prisoners, fire the catapults, work the drawbridge and gate and where the King stores his gold for the Dragon Knight to steal.
Inside the box we have 10 numbered bags, a unmarked bag for the larger plates and a cardboard insert with the instructions and stickers inside.
Inside the insert there are 3 instruction books a sticker sheet and 3
Plastic Flags with Lion and Crown.
Here is a close up of the sticker sheet and 3
Plastic Flags with Lion and Crown. There are 11 stickers to be applied throughout the build.
Let the build commence! Here is the contents of bag 1. This will build all 7 Minifigures in the set (to our Sons delight!), including the horse and the catapult.
The Lion King! (not Simba) He comes with a single side face print, printed front and back torso. Printed legs and he has a a
Dark Blue Cape,
Metallic Gold Crown and a Pearl Gold Sword.
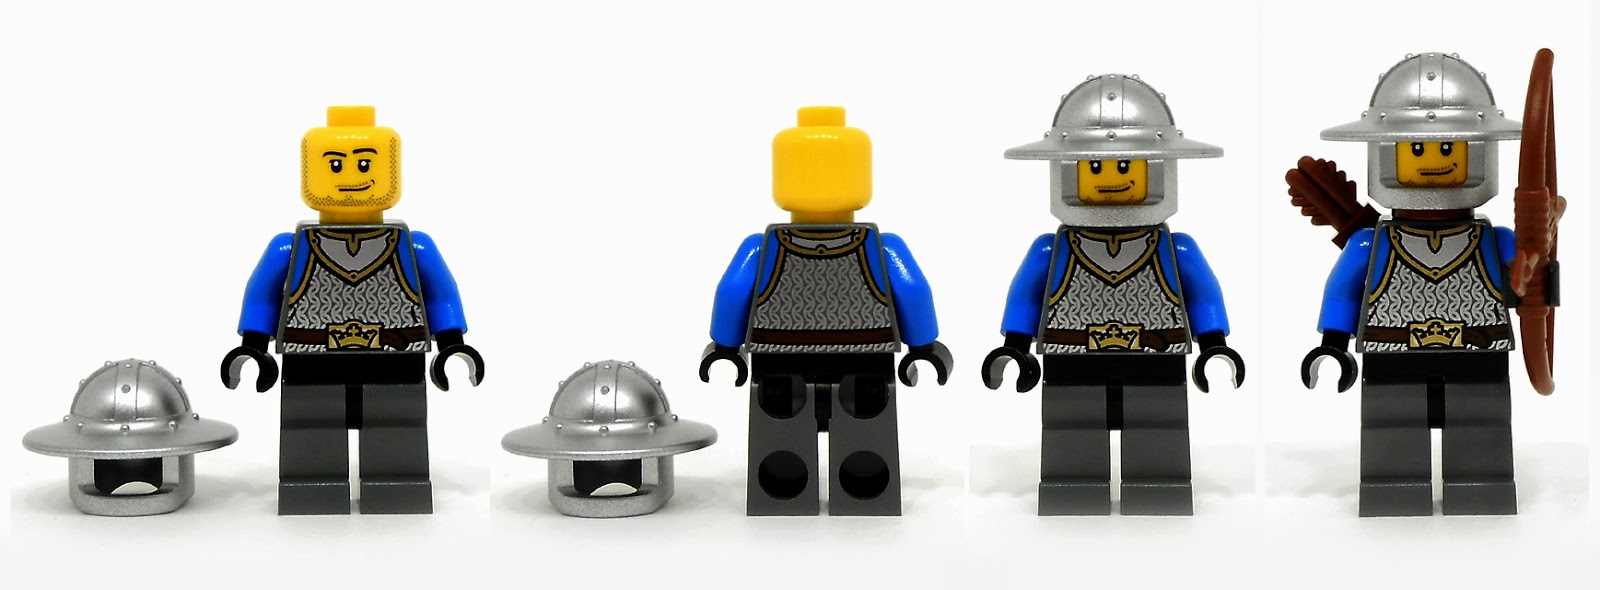
The King's Knight with crossbow
has a Blue and White with Chest Strap torso printed on the front and back, and a single sided face print. He has a
Metallic Silver Helmet with Neck Protector.
This King's Knight and bow and quiver comes with scale mail torso print both front and back. Single sided face print.
He has a Metallic Silver Helmet with Broad Brim.
This
King's Knight with Armor and sword comes with a single sided face print,
printed front and back King's Breastplate torso, and printing on the legs,
He also has printed armor and a large shield with a lions head. He has a
Metallic Silver Helmet with Light Bluish Grey Pointed Visor and a Blue Plume.
This Dragon Knight
with Armor and a large sword, has a double sided face print, the torso has printing on both the front and back with printing on the legs.
He also has printed armor and small shield with a Dragons head . He has a
Black Closed Helmet and Red Plume.
This Dragon soldier has a double sided face print, and the torso has printing on both the front an back and printing on the legs. He come with an axe. He has a
Black Helmet with Neck Protector
This Dragon
soldier has a double sided face print, and the torso has printing on
both the front an back. This soldier comes with a spiked mace. He has a black Cheek Protection Helmet. This Minifig is the same as 70400: Forest Ambush.
The
White horse is the new mold. It comes with
Lion Kings Armor and a close look at the new horse-head armor mold.
The Battering Ram/Catapult step by step build. Comes with 2 Brown 2x2 round bricks. When you push the front of the nose it fires the catapult. 1 Sticker was applied here.
Now we move on to bag number 2. This will start the build of the main gate and drawbridge.
A step by step build of the gate.
This is what it looks like after bag 2 is complete.
Bag 3 will build the middle section of the gate.
Here is the step by step build of the middle section of the gate. This is where the drawbridge section begins to work when you turn the wheel.
This is the contents of bag 4 and it will build and complete the upper section of the main gate.
A quick look at how the wheel is assembled to open and close the gate.
Some front and back images of the completed main gate/entrance. 1 Sticker was applied in this section.
The contents of bag 5 will build the left hand side octagonal section of the Castle.
Here is a step by step build of the octagonal section
A front and back view of this completed section. By pulling the catapult down and putting pressure onto the technic piece, letting go will make it fire... It works well. My son is happy just to play with this section alone. There were 3 stickers applied in this section.
This is how it looks when connected to the main gate/entry.
Bag 6 will build the right side corner section of this Castle.
This section was a very quick build. here is a step by step look at the building process.
This is how it looks when finished. A quick front and back view of the corner section. The panel in the middle and be pushed out so the Dragon faction can enter to steal the Kings gold... or over run and take over his kingdom.
Here is how it looks when added to the other sections of the Castle.
Bag 7 will build another corner section that will go on the back left hand side of the Castle.
The build is almost identical as the one above with the exception of the added stairs and no removable section in the wall.
Here is how it looks added to the rest.
Bag 8 will build the second octagonal section of the castle that will be place on the rear right side.
The build is pretty much the same as the first one, the only difference is the added prison. Just a close up of how it is done.
Here it is complete. There is no catapult on this one. There were 3 stickers applied in this section.
It is really starting to come together now!
The contents of bag 9 will start the build to the King tower and his throne.
A step by step build of the tower.
Here is what it looks like after bag 9 is complete.
Bag 10 will build the upper section of the tower. Oooooh!! Some Chrome gold pieces :-D Nice!
Yep... another step by step build of the upper section.
The tower is now complete! Here is a front and back view of the tower section. There are 3 final stickers to apply in this section.
With the Tower complete so too is the rest of the Castle! When finished it quite large!
Here are the spares we got for this set.
Some alternate images of the completed Castle. Front and back.
Overall it was a fun build with some cool pieces used. After doing the first 2 walls on either side of the main gatehouse it gets a little repetitive because the other 2 walls are the same with very minor differences. The Kings Tower was a good build but the "throne room" is on the small side. I am totally in love with the Minifigures! The prints on them are impressive and highly detailed! The Castle theme as a whole is packed full of printed elements and I very much prefer this, instead of always applying stickers to a given set. With a few alterations this could be a fantastic Castle! As it stands it is still a solid set and I have added to it in this W.I.P pic below... I reversed the L shape wall for this set up to work, and plan to add another 48x48 base plate at the front and use the parts from the second castle we bought to build an outer defense wall and add the
70402: The Gatehouse Raid to it. If you can get it for the right price like we did, we highly recommend you picking up 1 or 2 of these. ;-D
Just in case you missed the previous Castle reviews, the links are below...
LEGO Castle 70400: Forest Ambush Review.
LEGO Castle 70401: Gold Getaway Review.
LEGO Castle 70402: The Gatehouse Raid Review.
LEGO Castle 70403: Dragon Mountain Review.
Thanks again for reading and I hope you enjoyed the review!
As always and if you want too, let us know in the comments below, what
you think of the set. I would love to hear others opinions on it.
Until next time this is Tan Tile... MOCing a medieval scene till the next review.


